BiBiGrid Hands-on
FIXME
Overview
Time estimation: FIXME
Version: main
Last update: 2026-02-27
Questions:Objectives:
FIXME
FIXME
The goal of this session is to set up a small HPC cluster consisting of 3 nodes (1 master, 2 on demand workers) using BiBiGrid with Slurm (workload manager), Network File System (allows file sharing between servers) and Theia (Web IDE). This tutorial targets users running BiBiGrid on de.NBI cloud.
Table of Contents
- Prerequisites
- Clone bibigrid and bibigrid_clum
- Preparation
- Configuration
- The Cluster
- Hello BiBiGrid, Hello Antibiotic Resistance!
- Ansible - Let’s Automate
- Terminate a cluster
- Moving Forward
Prerequisites
- System base on Linux, OSX (tested) or Windows Subsystem for Linux (untested)
- required software packages
- Python >= 3.10
- git (required)
- openssh
- Openstack API access
Clone bibigrid and bibigrid_clum
git clone https://github.com/BiBiServ/bibigrid.git
git clone https://github.com/deNBI/bibigrid_clum.git
Your bibigrid folder should contain:
$ ls bibigrid
bibigrid  bibigrid_rest.sh  bibigrid.sh  bibigrid.yaml  documentation  README.md  requirements-dev.txt  requirements-rest.txt  requirements.txt  resources  tests
Preparation
Premade Template
Use the prefilled configuration template resources/bibigrid.yaml as a basis for your personal BiBiGrid configuration. Later in this tutorial you will use OpenStackClient or access Openstack’s dashboard manually to get all necessary configuration information from your project.
Copy the configuration template to ~/.config/bibigrid/.
mkdir ~/.config/bibigrid
cp /tutorials/bibigrid/resources/bibigrid.yaml ~/.config/bibigrid/bibigrid.yaml
This premade template includes volume keys for both master and worker giving you a permanent volume for your master
that is shared via nfs (see nfsShares) and one semipermanent volume for each worker.
Each volume is an SSD with 25 GB.
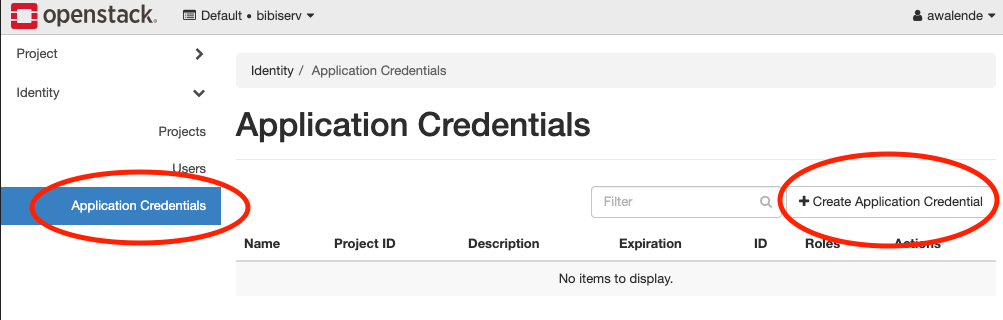
Authentication
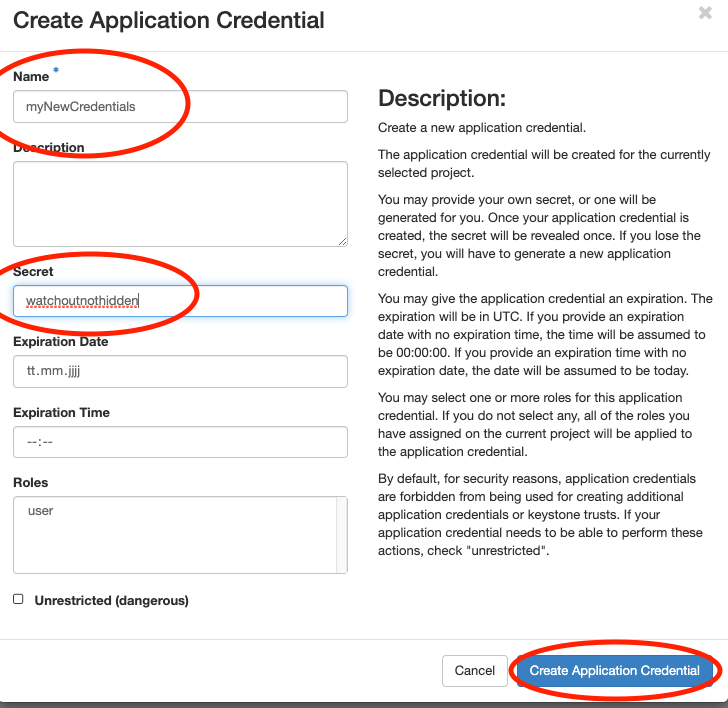
In this section you will create an application credential and download the autogenerated clouds.yaml. clouds.yaml contains all required authentication information. Follow the images:
Don’t use the input field secret.
- Its input is not hidden
- OpenStack will generate a strong secret for you, if you leave it blank.
Pick a sensible expiration date.
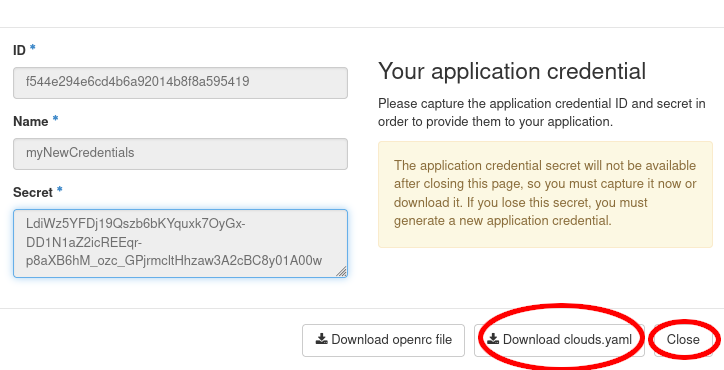
Save the downloaded clouds.yaml under ~/.config/openstack/ and ~/.config/bibigrid/. That will allow both OpenstackClient and BiBiGrid to access it:
cp ~/Downloads/clouds.yaml ~/.config/bibigrid/clouds.yaml
mkdir ~/.config/openstack
cp ~/Downloads/clouds.yaml ~/.config/openstack/clouds.yaml
Why not store BiBiGrids
clouds.yamlin openstack and avoid the extra copy?Answer
In the future BiBiGrid will support more than just one cloud infrastructure. Therefore, using the
~/.config/openstackfolder would be a disadvantage later.
Virtual Environment
A virtual environment is something that gives you everything you need to run specific programs without altering your system.
Creating a Virtual Python Environment
python3 -m venv ~/.venv/bibigrid
If this command fails, you probably need to install python3-venv manually.
For that first update sudo apt update && sudo apt upgrade and then sudo apt install python3.??-venv (use the correct version for your system).
Sourcing Environments
In order to actually use the virtual environment we need to source that environment:
source ~/.venv/bibigrid/bin/activate
Following pip installations will only affect the virtual environment.
The virtual environment is only sourced in the terminal where you executed the source command. Other terminals are not affected.
Fulfilling Requirements
Now let’s move into the bibigrid folder cd bibigrid we will stay in it unless explicitly mentioned otherwise.
You will now install packages required by BiBiGrid within your newly created virtual environment. If you haven’t sourced your environment yet, please go back. To install all BiBiGrid requirements, we simply install from the given requirements file:
pip install -r requirements.txt
Try executing openstack subnet list --os-cloud=openstack within this environment. If it runs without errors, you are ready to proceed. Otherwise you need to check your clouds.yaml and your virtual environment.
Configuration
Following the next steps you will update the premade template.
Why are some keys in the template already set?
Answer
In this hands-on, we want to make things as easy as possible for you. Just check whether the key you’ve found is the correct one and matches with the one we’ve written down in the configuration file already.
SSH access information
BiBiGrid needs to know which sshUser to use in order to connect to your master. You can set this key in your ~/.config/bibigrid/bibigrid.yaml file.
The sshUser depends on your server image. Since we run on top of Ubuntu 22.04 the ssh-user is ubuntu. Set the template’s sshUser key to ubuntu.
Network
We have created a subnet for this workshop for you. Determine your subnet’s Name by running:
openstack subnet list --os-cloud=openstack
Set the template’s subnet key to the result’s Name key.
How do I create a subnet for my own project?
Answer
If you have your own project outside of this workshop and would like to create a subnet, take a look at the OpenStack Quickstart from de.NBI Cloud Wiki. Depending on your cloud location, steps might slightly differ.
Instances
BiBiGrid needs to know type and image for each server. Since those are often identical for the workers,
you can simply use the count key to indicate multiple workers with the same type and image.
Image
Images are virtual disks with a bootable operating system. Choosing an image means choosing the operating system of your server.
Since images are often updated, you need to look up the current active image using:
openstack image list --os-cloud=openstack | grep active
Since we will use Ubuntu 22.04 you might as well use:
openstack image list --os-cloud=openstack | grep active | grep "Ubuntu 22.04"
Set the template’s image key of all instances to the result’s ID or NAME entry of the Ubuntu 22.04 row.
All servers will share the same image.
Do I have to update my configuration file whenever there is a new image version?
Answer
If you use the method described above, yes. However, you can also use a regex instead of a specific name to select an image during runtime. This has also avoids issues that may arise whenever an image is deactivated while your cluster is still running. For our Ubuntu 22.04 images you could use
^Ubuntu 22\.04 LTS \(.*\)$, but usually you need to check what image names are available at your location and choose the regex accordingly. For more information on this functionality take a look at BiBiGrids full documentation.
Flavor
Flavors are available hardware configurations.
The following gives you a list of all flavors:
openstack flavor list --os-cloud=openstack
Set the template’s flavor keys (provide an ID or NAME - we will use NAME in the following examples) to flavors of your choice - in this tutorial we will use de.NBI medium for our master and de.NBI small for our two workers. You can use a different flavor for the master and each worker-group.
Example: Multiple worker groups
The key
workerInstancesexpects a list. Each list element is aworker groupwith animage+typecombination and acount. In our tutorial we use a single worker group containing two workers. Since they are in the same worker group, they are identical in flavor and image. We could, however, define two worker groups with one worker each in order to use different flavors for them.workerInstances: - type: de.NBI tiny image: ubuntu-22.04-image-name count: 1 - type: de.NBI default image: ubuntu-22.04-image-name count: 1
Waiting for post-launch Services
Some clouds run one or more post-launch services on every started instance, to finish the initialization after an
instance is available (e.g. to configure local proxy settings or local available repositories). That might interrupt
BiBiGrid setting up the node (via Ansible). Therefore, BiBiGrid needs to wait for your post-launch service(s) to finish. For that BiBiGrid needs the
services’ names. Set the key waitForServices to the list of services you would like to wait for. For Bielefeld
this would be de.NBI_Bielefeld_environment.service. In the future you should be able to find post-launch service names by
taking a look at your location’s Computer Center Specific site - if
post-launch services exist at your location.
  waitForServices:
    - de.NBI_Bielefeld_environment.service
Check Your Configuration
Run ./bibigrid.sh -i bibigrid.yaml -ch -v to check your configuration. The command line argument
-v allows for greater verbosity which will make it easier for you to fix issues.
The Cluster
Starting the cluster
./bibigrid.sh -i bibigrid.yaml -c -vv creates the cluster with a verbose verbose output - great for us to see what’s happening. Cluster creation time
depends on the chosen flavor and the overall load of the cloud and will take up to 15 minutes.
List Running Cluster
Since several clusters can run simultaneously in a single project, listing all running clusters can be useful:
Execute ./bibigrid.sh -i bibigrid.yaml -l. You will receive a general overview of all clusters started
in your project.
Cluster SSH Connection
After a successful setup, BiBiGrid will print some information. For example:
Cluster 6jh83w0n3vsip90 with master 123.45.67.890 up and running!
SSH: ssh -i '~/.bibigrid/tempKey_bibi-6jh83w0n3vsip90' ubuntu@123.45.67.890
Terminate cluster: ./bibigrid.sh -i 'bibigrid.yaml' -t -cid 6jh83w0n3vsip90
Detailed cluster info: ./bibigrid.sh -i 'bibigrid.yaml' -l -cid 6jh83w0n3vsip90
You can now establish an SSH connection to your cluster’s master by executing the SSH line of your create’s
output:
ssh -i '~/.bibigrid/keys/tempKey_bibi-6jh83w0n3vsip90' ubuntu@123.45.67.890
But make sure to use the one generated for you by BiBiGrid since
- cluster-id (here
6jh83w0n3vsip90), - key name (here
~/.config/bibigrid/keys/tempKey_bibi-6jh83w0n3vsip90) - user@IP (here
ubuntu@123.45.67.890)
will differ on every run. Run sinfo after logging in. You should see something like this:
PARTITION AVAIL  TIMELIMIT  NODES  STATE NODELIST
openstack    up   infinite      2  idle~ bibigrid-worker-6jh83w0n3vsip90-[0-1]
openstack    up   infinite      1   idle bibigrid-master-6jh83w0n3vsip90
All*         up   infinite      2  idle~ bibigrid-worker-6jh83w0n3vsip90-[0-1]
All*         up   infinite      1   idle bibigrid-master-6jh83w0n3vsip90
Why are there two partitions (openstack and all) with the same nodes?
Answer
BiBiGrid creates one partition for every cloud (here
openstack) and one partition calledallcontaining all nodes from all partitions. Since we are only using one cloud for this tutorial, we only haveopenstackandall.
However, dealing with the cluster from just a terminal can be quite bothersome. That’s were Theia Web IDE comes in. Log out of your ssh connection for now.
Using Theia Web IDE
Theia Web IDE’s many features make it easier to work on your cloud instances. Take a look:
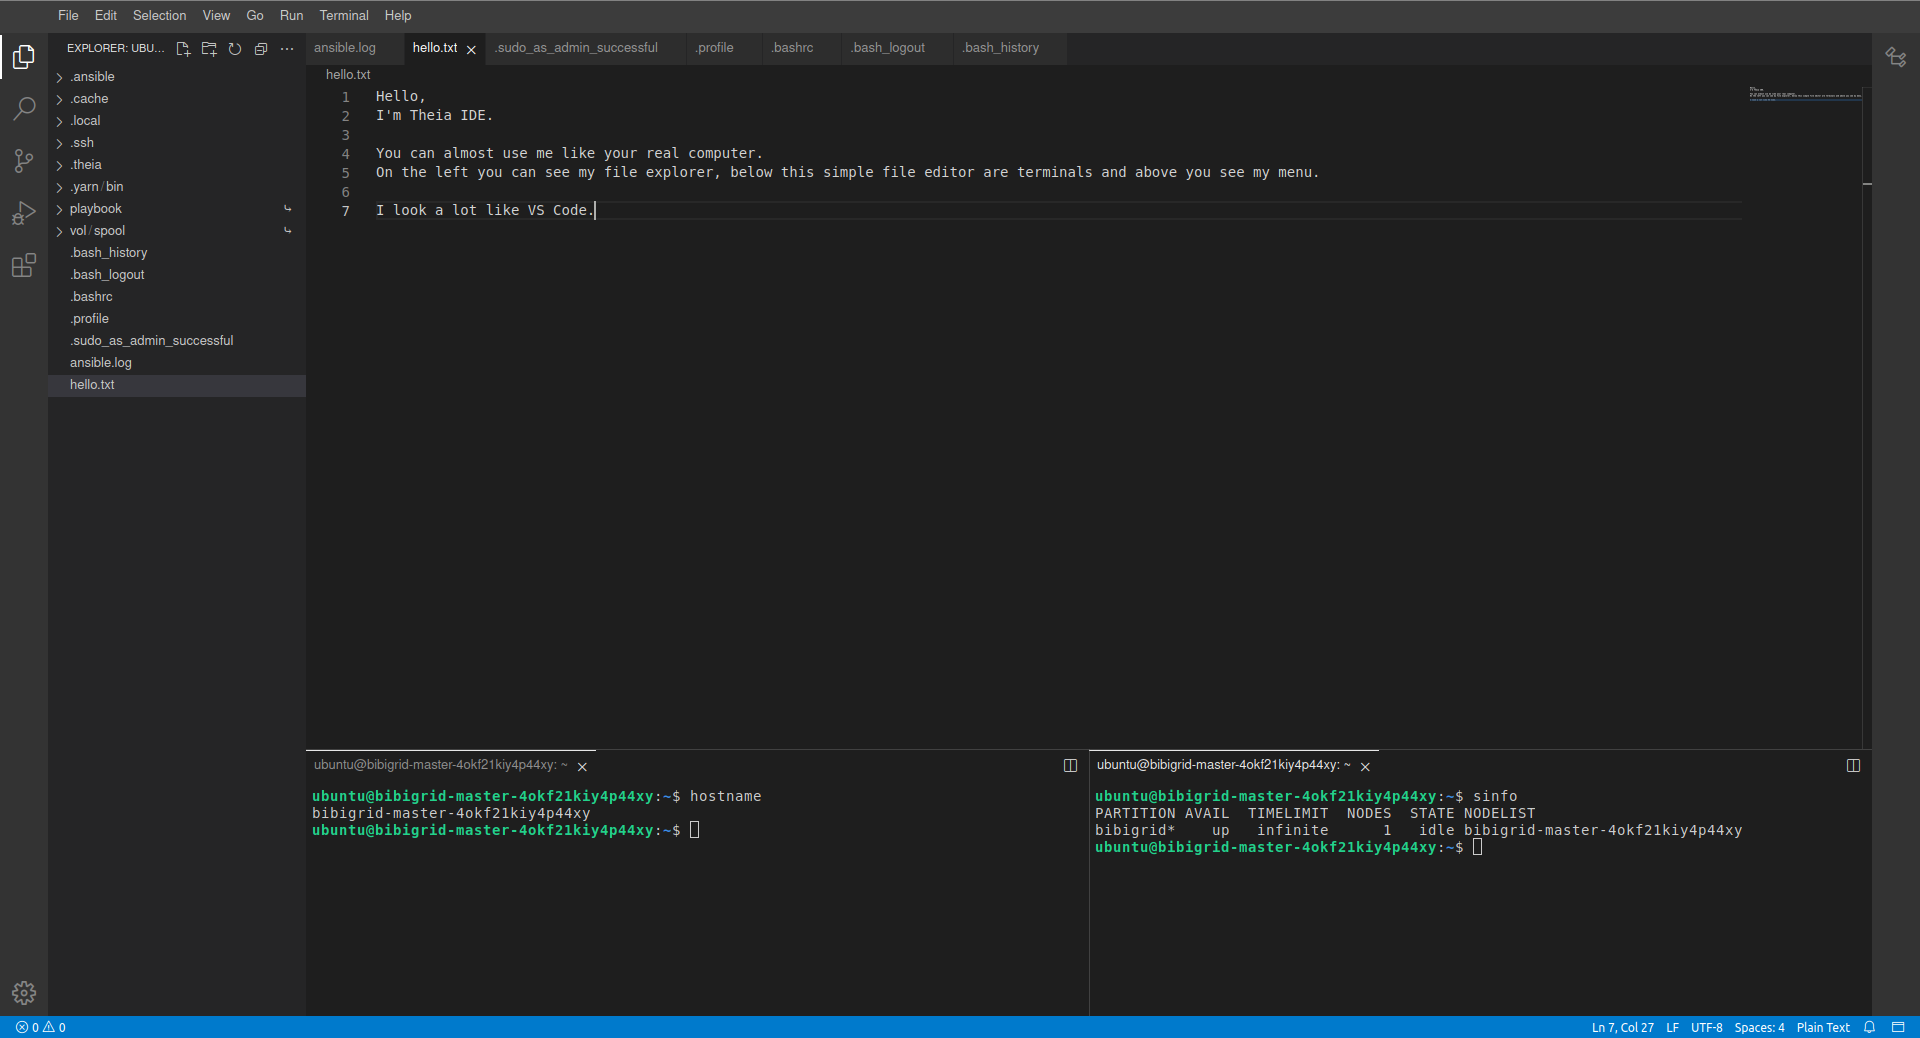
When enabled, Theia Web IDE is configured to listen on localhost port 8181 on the master instance. Since this address is not directly available you have to forward it to your machine using ssh. However, BiBiGrid handles that for you. Simply execute
./bibigrid.sh -i bibigrid.yaml -ide -cid [cluster-id]
to connect to Theia. A Theia IDE tab will be automatically opened in your browser. You could have omitted -cid [cluster-id]. If no -cid is given, BiBiGrid will attempt to connect to your last created cluster.
Hello BiBiGrid, Hello Antibiotic Resistance!
In this section, you will execute the resFinder workflow to create a heatmap of antibiotic resistances using your cluster. We will only focus on the workflow language Nextflow within this tutorial. However, you could use any software that comes with a SLURM executor instead or even run the jobs directly through SLURM’s CLI.
Digression: Job Scheduling (SLURM)
Slurm is used for job scheduling/workload management. To see all nodes in your cluster execute
sinfo. You will notice that workers areidle~. That means they areidleand~(powered down). Slurm uses many symbols and words to indicate node states. See here for more about that. To see all running jobs, executesqueue. You will notice that no job is currently running.
After successfully connecting to Theia IDE, we will now run our first job on our cluster. Let’s start with a “hello world”.
Hands On: Run job on cluster
- Open a terminal
- Create a new shell script
nano /vol/spool/helloworld.sh:#!/bin/bash echo Hello from $(hostname) ! sleep 10- Make
helloworld.shexecutable using chmod:chmod u+x /vol/spool/helloworld.sh- Change into the /vol/spool/ directory:
cd /vol/spool/- Submit this script as an array job 50 times :
sbatch --array=1-50 --job-name=helloworld helloworld.sh(run the job 50 times). The jobhelloworldruns now. It will take a while to finish, but you can already inspect some information while it runs.- The master will now power up worker nodes (as you described it in
bibigrid.yaml) to assist him with this job. Executesinfoafter a few seconds to see the current node status.- View information about all scheduled jobs by executing
squeue. You will see your jobhelloworldthere.- You can see
helloworld’s output using catcat /vol/spool/slurm-*.out.
Setting up nextflow
Install Java
sudo apt install default-jre
Download Nextflow into your /vol/permanent folder
cd /vol/permanent
wget -qO- https://get.nextflow.io | bash
Get and execute resFinder
Execute locally in this repository’s folder in order to copy our test workflow to the master; use your own key path (here 6jh83w0n3vsip90) and master ip (here 123.45.67.890)
scp -i '~/.config/bibigrid/keys/tempKey_bibi-6jh83w0n3vsip90' resources/Resistance_Nextflow.tar.xz ubuntu@123.45.67.890:/vol/permanent/Resistance_Nextflow.tar.xz
Execute on remote within /vol/permanent in order to unpack our workflow and run it on the master.
tar -xvf Resistance_Nextflow.tar.xz
./nextflow run resFinder.nf
Using squeue in another terminal will show you that this execution is not running on our slurm cluster.
On Slurm
In order to run our workflow on our slurm cluster, we need to set the executor to slurm. We have done that using a profile definition (see nextflow.config).
./nextflow run resFinder.nf -profile slurm
Once our workflow has finished, we can see the generated heatmap in outputs/collected_heatmaps/.
Ansible - Let’s Automate
Ansible, an open source community project by Red Hat, enables the idempotent setup of servers - installing software you need and so on. Knowing more about Ansible can be very helpful when handling clusters.
Let’s automate our setup using Ansible! We have already prepared most of it in our generel user_role example. To include the user role resistance_nextflow at ~/playbook/roles_user. Open ~/playbook/site.yaml and add resistance_nextflow to the hosts: master section:
- become: 'yes'
  hosts: master
  roles:
  - role: bibigrid
    tags:
    - bibigrid
    - bibigrid-master
  - role: resistance_nextflow
    tags:
    - resfinder
    become: False
  vars_files:
  - vars/common_configuration.yaml
  - vars/hosts.yaml
Next, we need to change our paths from /vol/spool but /vol/permanent given that we would like to store the workflow and its outputs on our permanent volume.
- debug:
    msg:
    - "Hello !"

- name: Unarchive ZIP file from GitHub repository
  unarchive:
    src: "https://github.com/deNBI/bibigrid_clum/raw/main/resources/Resistance_Nextflow.tar.xz"
    dest: "/vol/permanent/"
    remote_src: yes

- name: Install Java JRE on Debian/Ubuntu
  become: True
  apt:
    name: default-jre  # Package name for Java JRE on Debian-based systems
    state: present     # Ensure that the package is present, you can use "latest" as well

- name: Get Nextflow
  shell: wget -qO- https://get.nextflow.io | bash
  args:
    chdir: /vol/permanent/
And let’s execute our role, but first we need to remove everything we have done manually to ensure that our role actually works (for simplicity we will not uninstall java):
sudo rm -r /vol/permanent/* # in order to reset
bibiplay -t resfinder # bibiplay is a short-form for roughly "ansible-playbook path-to-site.yaml -i path-to-ansible-hosts"
Taking a look at /vol/permanent/, we can see that the output folder has been generated once again.
Terminate a cluster
Execute ./bibigrid.sh -i bibigrid.yaml -t -cid [cluster-id] -v. ./bibigrid.sh -i bibigrid.yaml -t also does the trick, since BiBiGrid will fall
back on your last created cluster if no cluster-id is specified.
Moving Forward
More BiBiGrid
Congratulations! You have finished BiBiGrid’s Hands-on.
You may want to take a look at the “real” bibigrid.yaml inside BiBiGrid’s repository. It has a lot more options. However, everything you learned here stays true.
Additional resources
More BiBiGrid
If you would like to deepen your knowledge maybe give BiBiGrid’s Features or the Software used by BiBiGrid a read. If you would like to know more about the configuration file see Configuration.
More Ansible
You can learn more about Ansible here:
Key Points
FIXME
Contributions
Author(s): Xaver Stiensmeier, Jan Krueger, Nils Hoffmann, Alexander Walende